Leadership is a crucial aspect of success in any organization. Effective leaders inspire and guide their teams to achieve their goals. Here are ten essential qualities that set great leaders apart:

  • Visionary: A great leader has a clear vision of where they want to take their team and organization, and they inspire others to join them in this journey.
  • Strategic thinker: Leaders have the ability to think beyond the immediate situation to think about the future of the organization.
  • Empathetic: Leaders understand their team members’ needs and motivations and utilize this information to foster a happy and effective work environment.
  • Communicator: Great leaders have strong communication skills and can convey their vision and plans in a clear and concise manner.
  • Adaptable: When presented with unforeseen obstacles, effective leaders are able to adapt to change and make swift judgments.
  • Decisive: Leaders make difficult choices even when presented with opposing viewpoints, and accept responsibility for the consequences of their actions.
  • Confident: Confidence inspires others to follow and believe in their leader. Confidence also allows leaders to make difficult decisions and take calculated risks.
  • Authentic: Authentic leaders lead by example and walk the talk. They have strong values and principles, and they are not afraid to stand up for what they believe in.
  • Inspiring: Great leaders are charismatic personalities who inspire and motivate teams to achieve their goals.
  • Coach: Leaders are excellent coaches and mentor their team members to help them reach their full potential.

In short, successful leadership is a blend of many attributes, and good leaders have a distinct blend of these fundamental qualities.
Individuals may become successful and inspirational leaders by cultivating these characteristics.

Checkpoints (Snapshots) are great feature for saving the state of the Virtual Machine before making changes like applying patches or updates, installing or configuring applications etc. If new changes or updates break the system, we can easily go back to the previous state. To allow this, Hyper-V creates another virtual disk file to store all the changes (in simple words). This causes the file to grow in size and depending on how much change data is being created on the VM it can grow either fast or slow. If the location where the checkpoints are being stored runs out of available free space, Hyper-V will pause the VM. This not only affects the VM that has the growing checkpoint, but also has the potential to affect other VMs that are stored in the same location (Storage Volume/LUN). This process occurs so that the VMs don’t start failing disk writes within the OS of the VM and possibly cause file corruption. To recover from this we have to delete the checkpoints that are not needed anymore. Because of this we have to be very careful when creating checkpoints and remember to delete the checkpoints that are not needed any more.

To avoid this problem and keep a control on the checkpoints I developed a PowerShell script that checks all the checkpoints for all the VMs and deletes the checkpoints that are older X number of day. The attached script currently checks for 3 days or older checkpoints, but this can be easily changed. Also, there can be occasions where we want some checkpoints to stay e.g. if there is a maintenance that is taking longer and we want to keep those checkpoints for longer than 3 days. For adding this function I changed the script to check for a file called “CheckPointsException.txt”, this file will have the names of the all the VMs that have exceptions to keep their checkpoints longer than 3 days. So, for all the VMs that are listed in this file, my script will not delete the checkpoints. Once the maintenance is done we can remove the VM name from this file and next time the scripts runs it will delete the checkpoints for that VM. This script can be add in the Windows Task Scheduler to run every day, or whatever schedule is need. This script also creates an HTML report will a list of VMs with their checkpoints that are older than 3 days and their status (exceptions etc.). It also emails this report to the list of recipients defined in the script. So, this report acts as a reminder that there are checkpoints that are in exceptions list so they are not forgotten.

You can add the Hyper-V Clusters and Standalone hosts at the top of the script. You would also need to set the paths to the reports file and CheckPointsException.txt file.

You can download the script below and rename it to .ps1. Please send me comments.

While working on a project I came across a problem for the VPN users. The VPN users machines were not registering their VPN assigned IPs to the DNS server and therefore the servers were not able to locate them by using their machine names. The setting “Register this connection’s addresses in DNS“ (as show in the screenshot below) makes this happen and it is not on/checked by default.

After doing a lot of googling I found out that the PowerShell commands to change the network adapter properties won’t work since VPN connection adapter is only visible when the VPN is connected or in other words when the VPN connection is in use. I also found out that these settings are stored in the file “rasphone.pbk”. Now the problem is that this file can exist in the following folders based on how the VPN connection was configured:

C:\ProgramData\Microsoft\Network\Connections\Pbk\rasphone.pbk
C:\Users\USERNAME\AppData\Roaming\Microsoft\Network\Connections\Pbk\rasphone.pbk

So to set this settings however the VPN was configured, I wrote the following script which resolved our issue.

$users = Get-ChildItem C:\Users
foreach ($user in $users) {
	$folder = "$($user.fullname)\AppData\Roaming\Microsoft\Network\Connections\PBK\rasphone.pbk"
	If (Test-Path $folder) {
		$RASPhoneBook = $folder
		(Get-Content $RASPhoneBook) -Replace 'IpDnsFlags=0', 'IpDnsFlags=1' | Set-Content $RASPhoneBook
	}
}

foreach ($user in $users) {
	$folder = "$($user.fullname)\AppData\Roaming\Microsoft\Network\Connections\PBK\_hiddenPbk\rasphone.pbk"
	If (Test-Path $folder) {
		$RASPhoneBook = $folder
		(Get-Content $RASPhoneBook) -Replace 'IpDnsFlags=0', 'IpDnsFlags=1' | Set-Content $RASPhoneBook
	}
}

$folder = "C:\ProgramData\Microsoft\Network\Connections\Pbk\rasphone.pbk"
If (Test-Path $folder) {
	$RASPhoneBook = $folder
	(Get-Content $RASPhoneBook) -Replace 'IpDnsFlags=0', 'IpDnsFlags=1' | Set-Content $RASPhoneBook
} 

What it does is, first it looks for this file in the specified folder for all the users, and then when it finds this file, it sets this “Register this connection’s addresses in DNS”. Then it looks for the file in “C:\ProgramData” folder and if it finds this file, it sets this setting there also. This resolved the issue for us for all the machines.

Thanks for reading this and I hopes it solves your problem too.

We are using Hyper-V for virtualization. We have several Hyper-V clusters running hundreds of VMs. From time to time there is a need to the reboot Hyper-V host servers usually when we push updates to them or sometimes just to refresh them. We all know that Window OS likes regular reboots to refresh itself.

So, whenever we needed to reboot the host servers, we had to do them manually. The steps we had to do are:

  • Pause” first host/node and “Drain” roles
  • Once it is in “Pause” state, reboot it and wait for it come online
  • When the host is online, “Resume” it and move to the next host

This was a time consuming task therefore I decided to develop a script to automate this task. The script is attached and you can download and use it if you want.

Now let me explain a bit what this script does. As you can see I have added some output commands so we can we can monitor the execution and see what is being done at each step. The script takes the cluster name as an argument. You run the script using the command below:

.\RebootClusterHosts.ps1 -Cluster "ClusterName"

Replace the above “ClusterName” with the name of your cluster. At first the script gets a list of all the nodes in the cluster and then goes into a “for” loop to process each node. It firsts check if the node is up (there maybe one or more nodes down because of any issues or maintenance), if that node is not up then it skips it and moves to the next node. If the node is up, it starts the process to Drain the Roles/VMs from the node and pause it. It then waits until all the Roles/VMs are drained and the node is paused. When this process is complete, the script waits for 5 seconds before reading the status of the node (I added a “sleep” for 5 seconds just to give it a few more time to refresh). After that it checks the status of the process, it checks the node DrainStatus and node State. If DrainStatus is not “Complete” and State is not “Paused” that means something went wrong. We have seen issues where sometimes all the Roles/VMs are not successfully migrated to other nodes and this process fails. This is where the script prompts the user that draining was not successful and they need to drain the node manually and press [Enter] key when done, so the script execution can continue. So, here the user needs to drain the node manually, once done they can press [Enter] key.

If the draining was completed successfully, no user interaction is needed and the script continues to restart the node and then it waits for the node the come online. I added the switch to the Restart command to wait for PowerShell status to come online. I have seen that this check is not enough and sometimes the nodes take longer to fully become available after the reboot. That is why here I have also added a “sleep” for 15 seconds to give the node another 15 seconds. Then after that there is a while loop that checks the status of the node every 1 second until it becomes available. When the node becomes available, the script Resumes/UnPauses the node. I have used another while loop here where the script tries to resume the node and check it’s status after every 1 second until it’s status becomes “Up“. I have ran into the issue where sometimes trying to resume the node once did not go well therefore I added a while loop here.

When the node’s status becomes “Up” the script moves to the next node and does all that processing mentioned above on that node.

I have ran this script multiple times and have tuned it as I came across issues. You all are welcome to modify it according to your needs. If you find something that can be done better, please do let me know.

This script can be used for rebooting failover cluster hosts/nodes and not only Hyper-V cluster hosts/nodes.

Thanks all!

Download the script below.

I noticed that when I login to a Windows 10 machine from a Windows 7 machine using Remote Desktop (RDP), I was able to authenticate fine using my Smart Card. But once I am inside the Windows 10 machine and want to RDP to another machine, I don’t get Smart Card authentication option in RDP window. Even if I want to use any command that requires elevated privileges I don’t get Smart Card authentication option.

It really seems like that Windows 7 machine is not passing or redirection Smart Card to the Windows 10 machine. When I RDP from Windows 10 machine to a Windows 10 machine, Smart Card is passed/redirected fine and I don’t see this problem.

Anyway, after searching a lot on the net I finally found the solution in one of the TechNet post. i.e. to remove the following updates from the Windows 7 machine:

KB2830477 
KB2592687

After uninstalling these two updates, I rebooted my Windows 7 machine and tried RDP to my Windows 10 machine. Smart Card redirection started working fine.

Please try it if you are having this issue.

Thanks for reading.

At my work we are required to use Smart Card to login to our systems. It works fine as long as we are logging on to our Macs or our Windows Desktops. Even if we use Remote Desktop connection from our Windows desktops to other Windows machines, it works without any issues. The problem occurs when we try to logon to Windows machines from Macs. There aren’t many Remote Desktop client options available for Mac that support Smart Card redirection. Even Microsoft Remote Desktop client on Mac currently does not support Smart Card redirection. I found a nice client Royal TSX that supports Smart Card redirection and it works fine. Actually it worked fine until Windows 7 and Windows 2012 Server. It stopped working with Windows 8 and Windows 2012 R2. It looks like Microsoft has changed the behavior of Smart Card service in Windows 8 and Windows 2012 R2. When I try to logon to Windows 2012 R2 Server or Windows 8 from Mac using Remote Desktop, I get the error “No valid certificates were found on this smart card” as shown below.

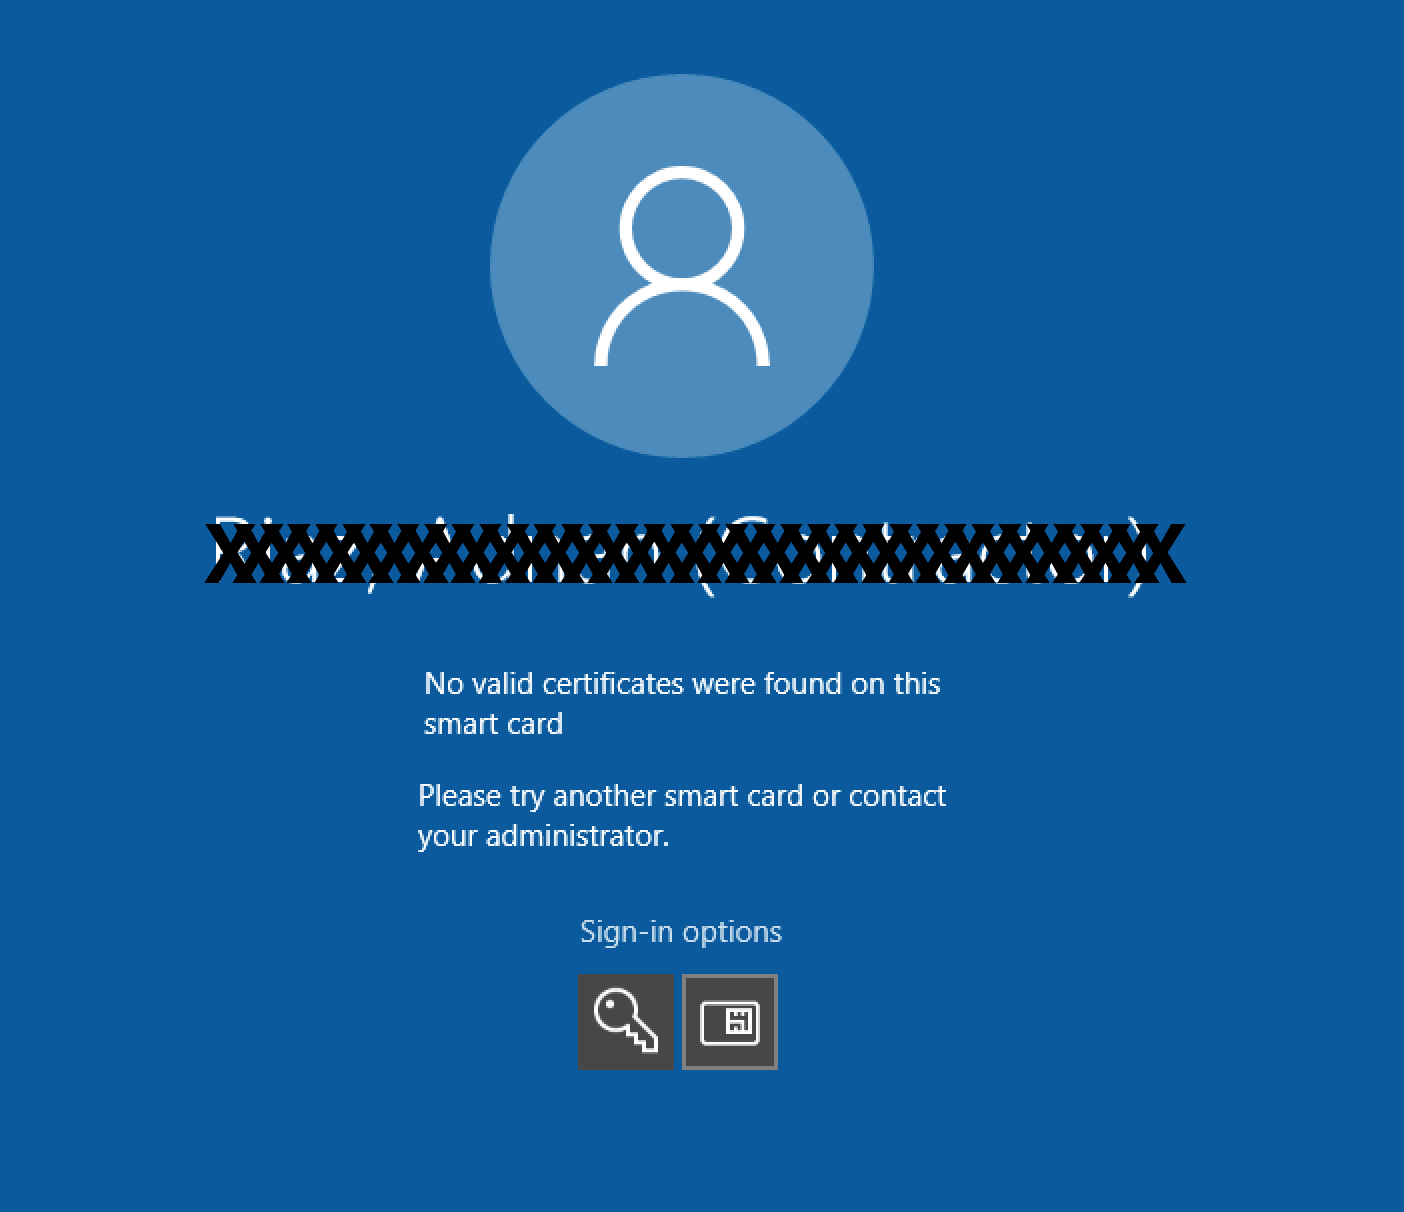
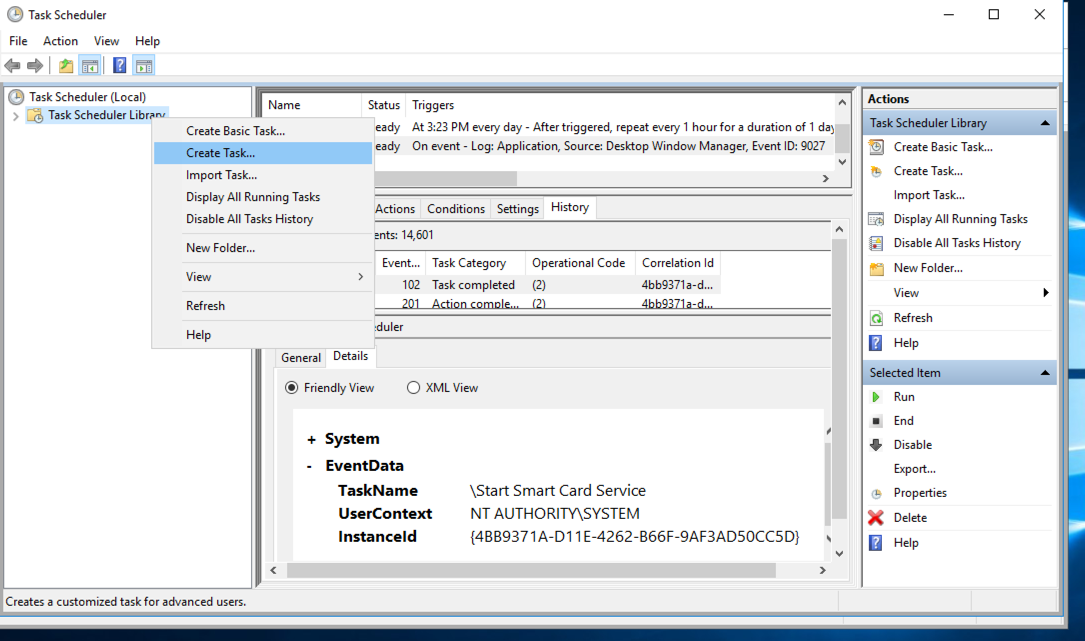
hmmm. The workaround I used for this was to connect to my Windows 7 Virtual Desktop and from there connect to Windows 8, Windows 10 or Windows 2012 R2 machines. This was an ok workaround until recently when my Virtual Desktop was upgraded to Windows 10. I was expecting that this Smart Card issue would have been resolved in Windows 10 but Windows 10 has the same issue. After doing some research online I found out that Microsoft has changed how Smart Card service behaves in Windows 8 and later. The Smart Card service only starts when it detects the Smart Card reader. It looks like when I Remote Desktop from Mac to the Windows machine the Windows machine is unable to detect the Smart Card and therefore the service does not start. I tested it by manually starting the Smart Card service and I was then able to logon to the machine. Now the problem is how can I make sure to start the service when I am connecting via Remote Desktop. I noticed that when I connect using Remote Desktop, the event viewer logs an event “9027” in Application Logs, as shown below.

Now I think that I can use this event and use task scheduler to start the Smart Card service whenever there is this event in the Application Log.

I started the Task Scheduler and created a new Task by using the steps below.

Start Task Scheduler, right-click on Task Scheduler Library and then click on Create Task

Name the task whatever you want, I used “Start Smart Card Service”.

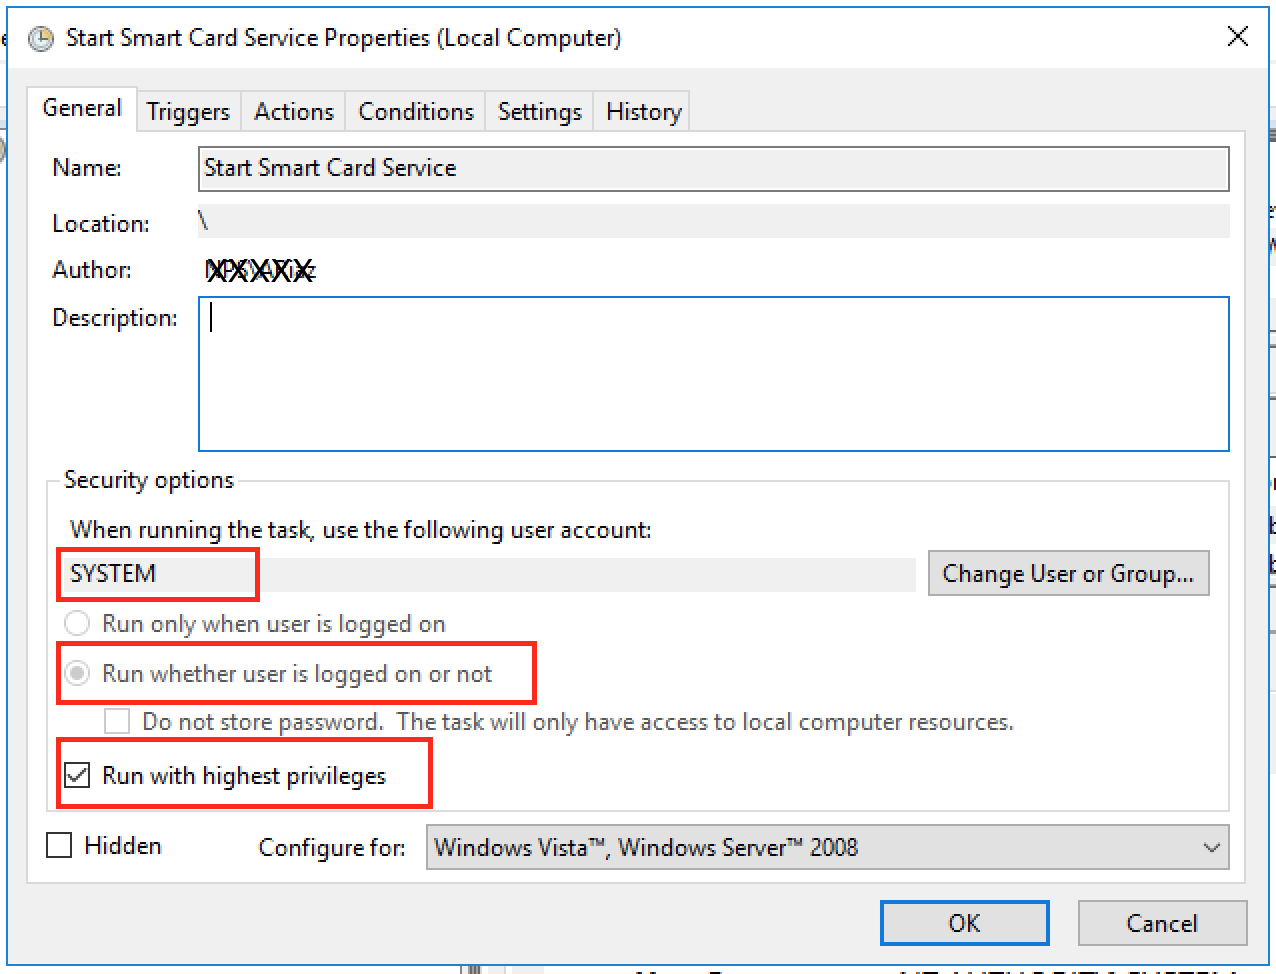
Make sure to use the options as shown in the picture above.

“When running the task, use the following user account:” needs to be set to “SYSTEM”. We want this task to run as SYSTEM user.

“Run whether user is logged on or not” needs to be selected. We want this task to run whether any user is logged on or not.

“Run with highest privileges” needs to be checked. We want this task to run with highest privileges. The task may run fine without checking this box, but I just checked it so that it doesn’t fail because of the lack of any permissions etc.

Now go to “Triggers” tab

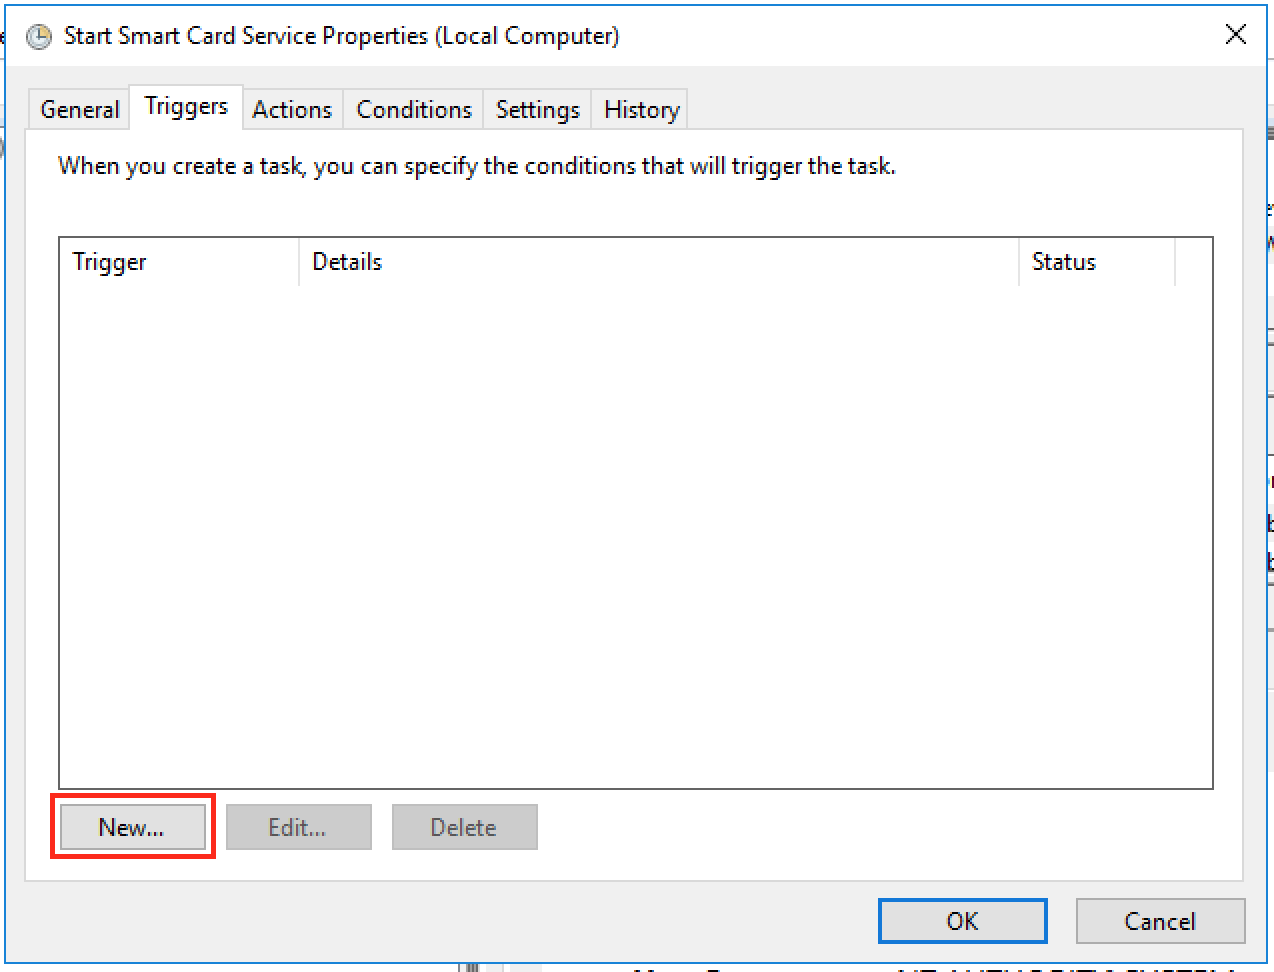
Here click on “New” button to create a new trigger. You will see the following window

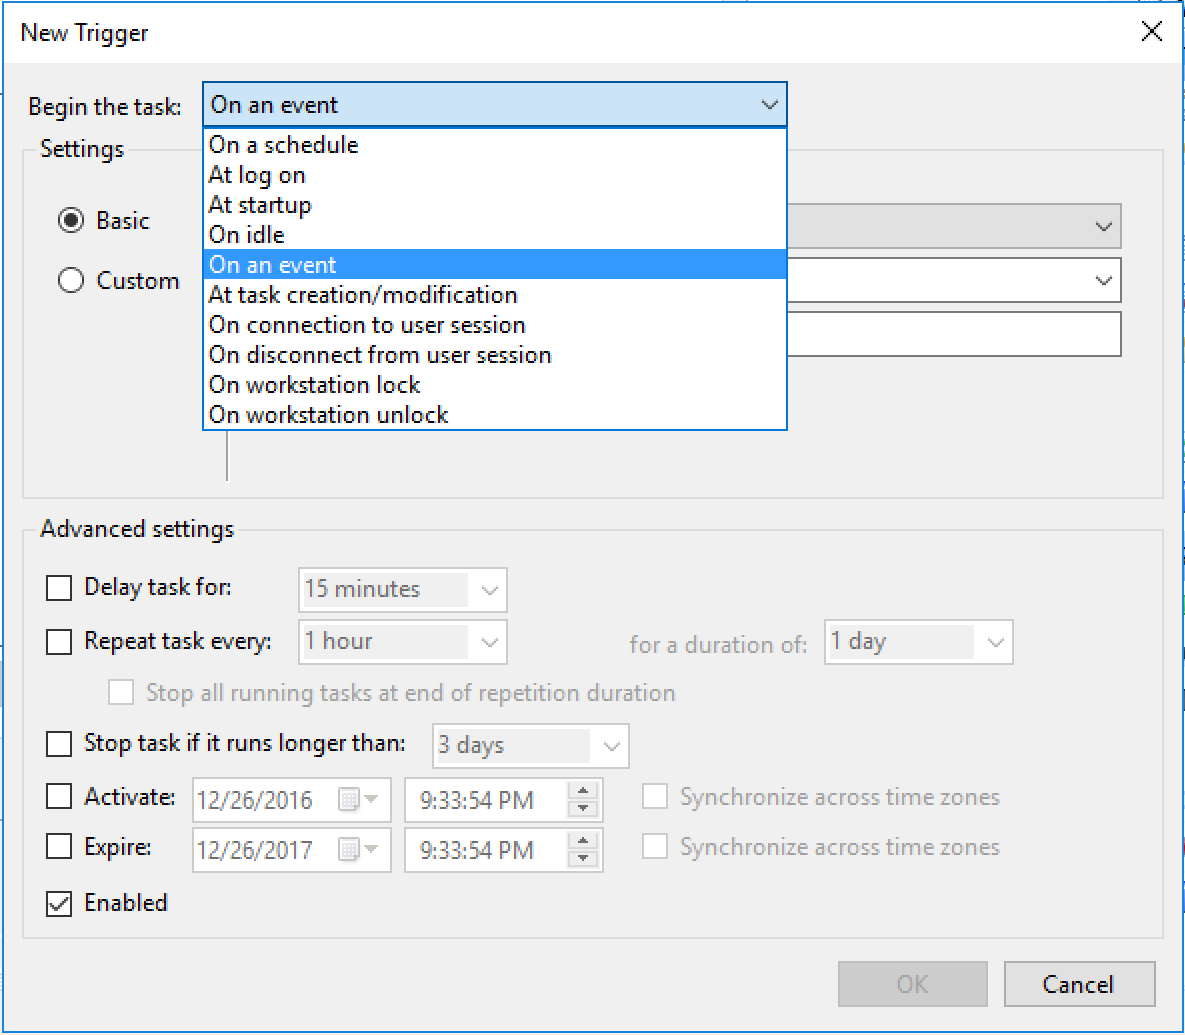
Click on the dropbox next to “Begin the task:” and select “On an event”. We want to start the task on an event.

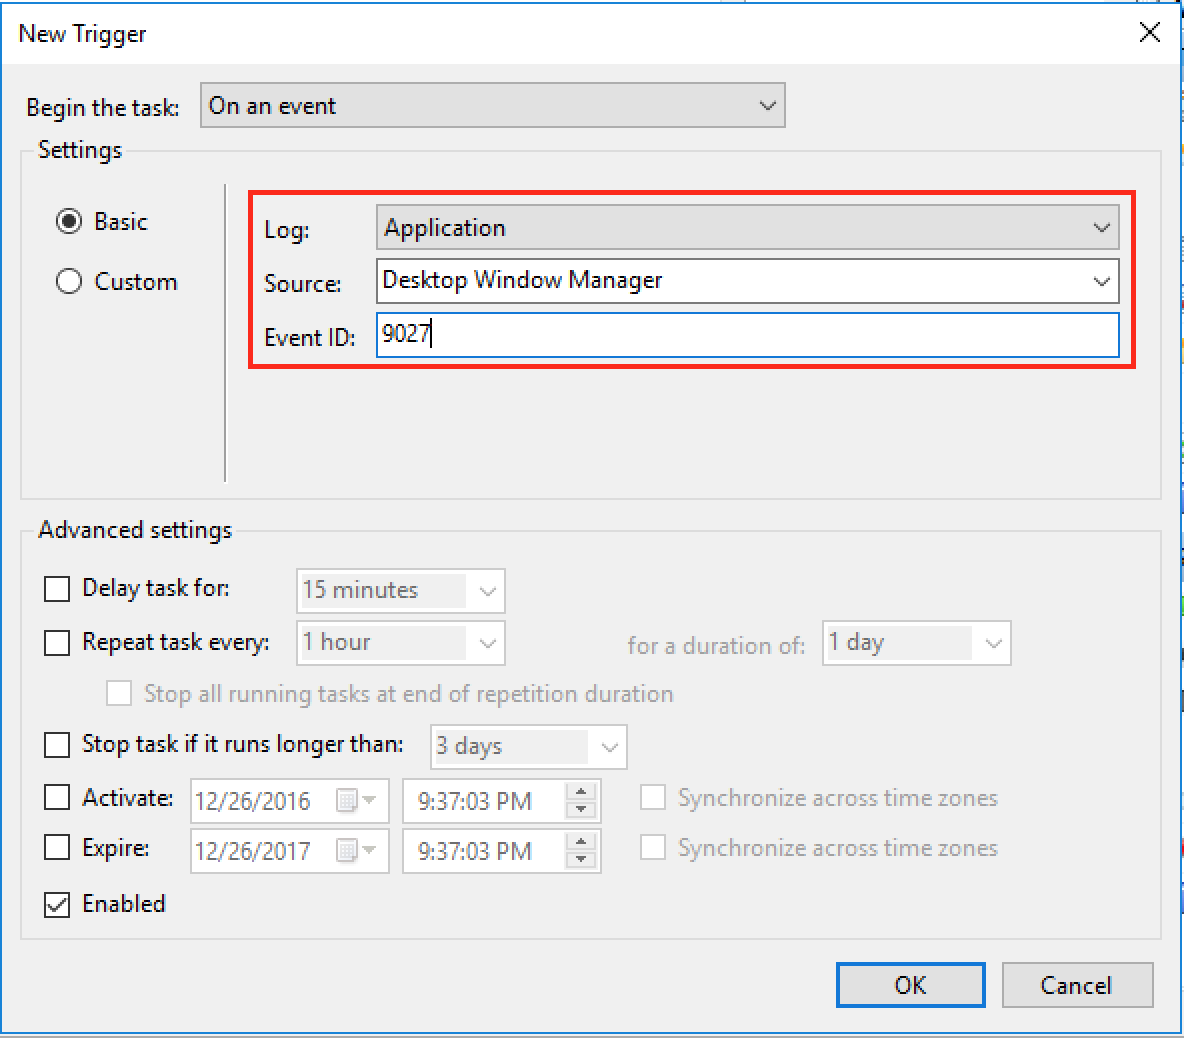
Now in the “Log:” dropbox, select Application

In the “Source:” dropbox, select “Desktop Window Manager”

and in the “Event ID:”, type “9027”.

We saw from the Event Viewer log that the log type of “Application”, Source is “Desktop Window Manager” and Event ID is “9027”. So, we want this task to run on this event only. Now click on “OK” and you will see this trigger added.

Now go to Actions tab

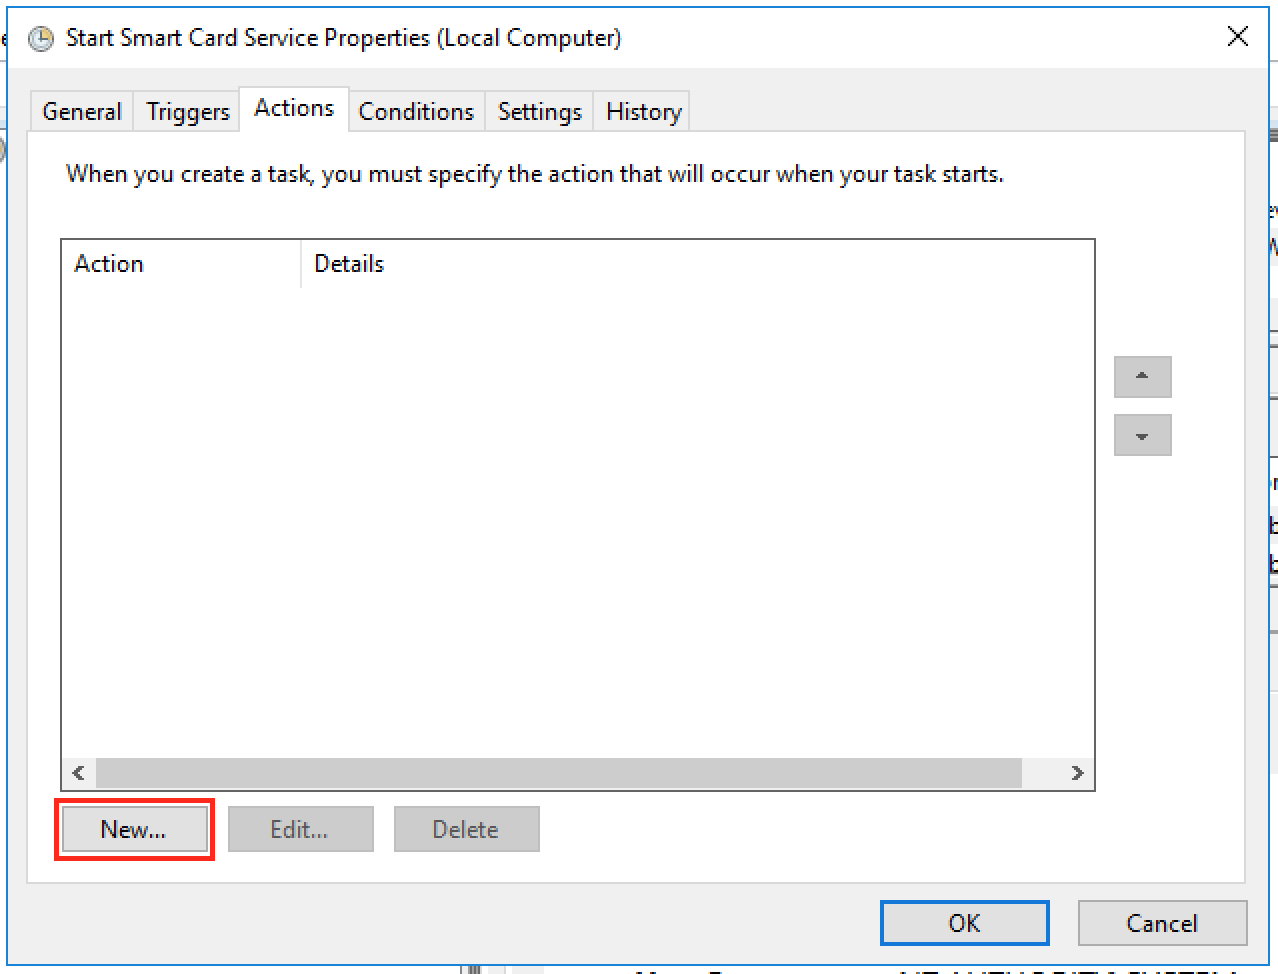
Click on “New” button to add an action.

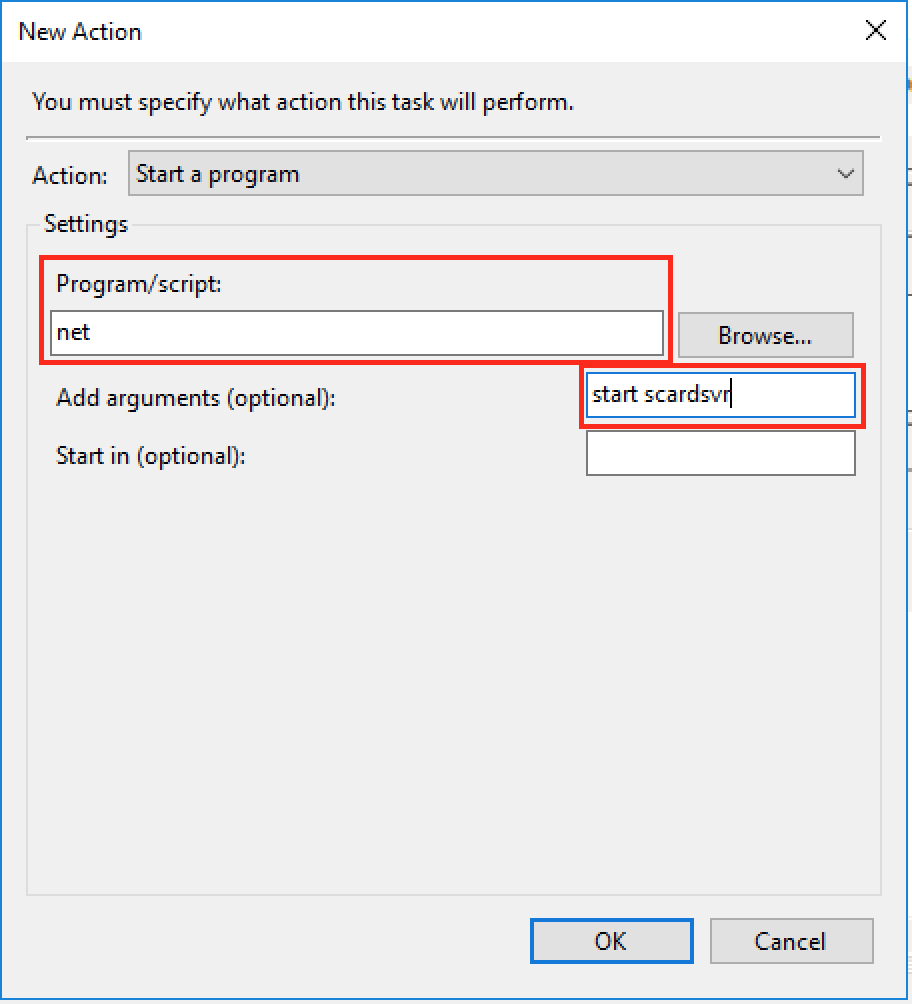
In the “Program/script:”, type “net”. In the “Add arguments (optional):”, type “start scardsvr”. i.e. we want to run “net start scardsvr” to start the Smart Card service. Now click on “OK” to close this window. Everything else can be left as default so you can click on “OK” again to close the properties window.

Now your task is setup and will show up in the list of tasks. This task should start the Smart Card service whenever you connect using Remote Desktop Connection.

Try it, when you connect using Remote Desktop, it should now read the smart card and ask you to enter your PIN, after entering the PIN you should be able to logon to your Windows 10 machine. If it doesn’t work, try taking out the smart card and inserting it again.

Now this resolved my issue with connecting to my Windows 10 Virtual Desktop from my Mac Desktop. But later on I faced another issue, when I lock my Windows 10 machine, after sometime it stops accepting my Smart Card and gives me either “No valid certificates were found on this smart card” or “The requested key container does not exist on the smart card” error. I haven’t found a workaround for this and am still looking to see what event it generates to maybe trigger my task on that event too. But for now, whenever I receive these errors while trying to unlock my Windows 10 machine, I just disconnect the session and reconnect and it works fine. I will update my post if I am able to develop a workaround for this.

This workaround should work on Windows 2012 R2 also, the difference is that Windows 2012 R2 server may generate some other event in the event log other than “9027” and you would have to look for that and configure your task to trigger on that event instead.

If you need help, please don’t hesitate to contact me. I would also like to request that if you find a better workaround, please let me know.

Until Microsoft or Apple (whoevers the issue is) resolves this issue, I am using this workaround.


Thanks for reading my post!


I recently heard from my colleague that Powershell has been released on Mac OSX and Linux. I wanted to give it a try since I have been using Mac since a few years and have also been using the shell commands. I have worked on several Linux systems in the past several years. I started using Linux when it was all text/shell based and there was no GUI. Therefore I am very comfortable using shell on Linux. Since OSX is very similar to BSD and BSD is a Unix operating system.

I have used Powershell a lot in Windows systems and was excited to try it on my Mac as well as Linux. I thought about writing this article to help others who want to install it and test it on their Mac systems. If time permits, I will also try it on a Linux system and post an article for that.

Installation

So, let’s start with the Powershell for Mac OSX. First you need to download the pkg file from here. Then you can either open the terminal and run the following command:

sudo installer -pkg powershell-x.x.x.pkg -target /

Replace x.x.x with the version no. of the file you downloaded.

Or you can just double-click the powershell-x.x.x.pkg file. When I ran the above command I got the following error:

xxxxx is not in the sudoers file. This incident will be reported.

It is pretty easy to resolve this issue. Open “System Preferences”, Click on “Users & Groups”. Select your account, click the lock button on bottom left to unlock it (it will ask you for administrator credentials), then check “Allow user to administer this computer”. Please see the figure below.

After this you should be able to run the command mentioned above to install Powershell. If you decide to go with the easier route, just double-click on the file to install it. When I tried this, I got the following error:

It is easy to resolve this error. Open “System Preferences”, Click on “Security & Privacy”. Click the lock button on bottom left to unlock it. Then click on “Open Anyway”. See the image below:

Another way of making it work is to control+click on the .pkg file. The installation will start and you just have to follow the prompts.

After this you would see a prompt to provide the credentials for administrative privileges and then click on “Install Software”. In a few seconds it will be install and you will get the following prompt:

Now you can click on the “Close” button. Powershell is now installed, you can open the Terminal and type Powershell to launch the powershell process. You will then see the powershell PS prompt. You can run the $PSVersionTable command to see the versions.  You can use the tab button to complete the command like in Windows. Type $psver and press the tab button and you will see that it will complete the command and also change the case, it will complete the command as $PSVersionTable.

You can run Get-Command to see a list of the commands available and Get-Module to see a list of the modules available. Run sw_vers to get the version information.

You can now enjoy exploring Powershell on your Mac.


Uninstallation

Powershell on Mac OSX must be uninstalled manually. To remove the package, run the following command:

sudo rm -rf /usr/local/bin/powershell /usr/local/microsoft/powershell


SCVMM Shows Error as below

Error (801)
VMM cannot find VM object xxxxxxxxxxxxxxxxxxxxxxxxxx.

Recommended Action
Ensure the library object is valid, and then try the operation again.

Run the following Powershell script. It will remove the VMs with missing VHD info from SCVMM Console. It will not delete the VMs, it will only remove them from SCVMM DB and Console.

Import-Module -Name "virtualmachinemanager"
Get-Vmmserver YOURVMMSERVERNAME
$Cluster = Get-VMHostCluster YOURCLUSTERNAME
$VMHosts = Get-VMHost -VMHostCluster $Cluster

foreach ($VMHost in $VMHosts) {
	$VMs=Get-VM -VMHost $VMHost

	foreach ($VM in $VMs) {
		if (Get-SCVirtualHardDisk -VM $VM) {
			#VM is fine, VHD info is fine, do nothing
			Write-Host $VM" is Good"
		}
		else {
			#VHD info is bad, delete VM from SCVMM
			Write-Host "Removing "$VM
			Remove-SCVirtualMachine $VM -force
		}
	}

	foreach ($VM in $VMs) {
		if (Read-SCVirtualMachine -VM $VM) {
			Write-Host $VM" is Good"
			#VM is fine, do nothing
		}
		else {
			#VM info is bad, delete VM from SCVMM
			Write-Host "Removing "$VM
			Remove-SCVirtualMachine $VM -force
		}
	}
}

When right-clicking on the Virtual Machine and clicking on Properties, the VMM Console Crashes. When you check the Event Logs, it shows the error similar to this:

Description:
Stopped working

Problem signature:
Problem Event Name : CLR20r3
Problem Signature 01: vmmadmin.exe
Problem Signature 02: 1.0.523.0
Problem Signature 03: 4d432cdf
Problem Signature 04: System.Windows.Forms
Problem Signature 05: 2.0.0.0
Problem Signature 06: 4f682206
Problem Signature 07: 14d0
Problem Signature 08: 23
Problem Signature 09: System.ObjectDisposedException
OS Version: 6.1.7601.2.1.0.274.10
Locale ID: 1033

Try the following to fix the the issue:

Open VMM Powershell prompt and run the following command

Get-VM -Name “Name of the VM” | Remove-VM -Force

The VM should stay online but will be removed from the VMM. It will reappear automatically after a while or you can right-click the host and Refresh Virtual Machines.